Hot Chocolate Bombs
Equipment
- Silicone sphere mold (2.5–3 inch)
- Microwave-safe bowls
- Small offset spatula or pastry brush
- Baking sheet
- Parchment paper
- Small plate
Ingredients
Chocolate Shells
- 16 oz chocolate melting wafers or high-quality semi-sweet chocolate finely chopped if using a bar; divided
- 1 oz white chocolate melting wafers for drizzle decoration
Filling
- 1/2 cup hot cocoa mix about 1 tablespoon per bomb
- 1/2 cup mini marshmallows about 1 tablespoon per bomb
- 1/4 tsp vanilla extract optional, stir into cocoa mix
- 1 pinch sea salt optional, adds depth
For Serving
- 8 oz whole milk per bomb heated to steaming, about 160–170°F
- whipped cream optional topping
Instructions
Melt the Chocolate
- Place 12 oz of the chocolate melting wafers in a microwave-safe bowl. Microwave in 30-second intervals at 50% power, stirring after each interval, until fully melted and smooth — about 90 seconds to 2 minutes total. Do not overheat.
- Reserve the remaining 4 oz of chocolate for a second coat.
Coat the Molds — First Layer
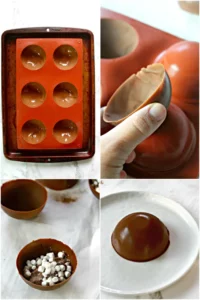
- Using a small offset spatula, spoon, or pastry brush, spoon about 1 tablespoon of melted chocolate into each half-sphere cavity of your silicone mold. Use the back of the spoon or a brush to spread the chocolate evenly up the sides and over the rim, making sure there are no thin or bare spots.
- Place the mold on a baking sheet and refrigerate for 5–7 minutes until fully set.
Apply the Second Coat
- Melt the remaining 4 oz of chocolate. Apply a second coat to each cavity, again spreading all the way to the rim and paying extra attention to the edges. This second coat gives you thick, sturdy shells that won't crack.
- Refrigerate again for 10 minutes until completely firm and set.
Unmold the Shells
- Gently flex the silicone mold from the bottom to release each chocolate shell. Work slowly and carefully — press up from beneath rather than pulling from the sides. Place the shells on a parchment-lined baking sheet.
- You should have 16 half-sphere shells total (2 halves per bomb).
Fill the Shells
- Choose 8 halves to be the 'bottom' of your bombs (these get filled). Add 1 tablespoon of hot cocoa mix and 1 tablespoon of mini marshmallows to each bottom half. Add a tiny pinch of sea salt and a drop of vanilla extract if using.
Seal the Bombs
- Microwave a small plate for 30 seconds until warm (not hot). Take one of the unfilled shell halves and gently press its rim face-down onto the warm plate for 1–2 seconds, just until the edge begins to melt slightly.
- Immediately press the warm-edged shell on top of a filled half, lining up the edges. Hold gently for 10–15 seconds until sealed. Place on a parchment-lined baking sheet and repeat with remaining shells. Refrigerate for 10 minutes to set the seams.
Decorate
- Melt the white chocolate in a small bowl. Transfer to a zip-top bag and snip a tiny corner off. Drizzle over the sealed bombs in a zigzag pattern. Add sprinkles, crushed candy cane, or a dusting of cocoa powder if desired.
- Refrigerate until the decoration is set, about 5 minutes.
Serve
- Heat 8–10 oz of whole milk per serving until steaming (160–170°F). Place one hot chocolate bomb in a large mug. Pour the hot milk over or around the bomb and watch it melt open! Stir to combine, top with whipped cream if desired, and enjoy immediately.
Notes
Storage: Store assembled bombs in a single layer in an airtight container in the refrigerator for up to 2 weeks.
Gifting: Let bombs come to room temperature for 15 minutes before packaging to prevent condensation.
Milk tip: Whole milk gives the richest result. Oat milk or almond milk also work for a dairy-free option — just ensure your chocolate and cocoa mix are dairy-free too.
Shell thickness: Don't skip the second coat. Thin shells crack during sealing.
Mold size: A 2.5 to 3-inch diameter silicone sphere mold works best — widely available online for under $10.
Nutrition
Calories: 210kcalCarbohydrates: 28gProtein: 2gFat: 11gSodium: 85mgFiber: 1gSugar: 22g