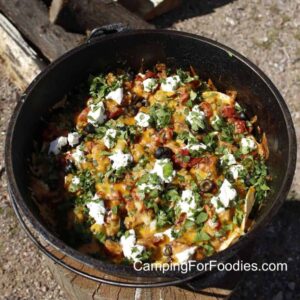
Dutch Oven Campfire Nachos
Equipment
- 5-quart cast iron Dutch oven with lid
- Heat-resistant gloves or oven mitts
- Long metal tongs (for handling coals)
- Lid lifter or sturdy hook (for campfire use)
- Can opener
- Measuring cups
Ingredients
Main Ingredients
- 9 oz thick-cut tortilla chips sturdy restaurant-style or multigrain chips work best
- 2 cups shredded cheese sharp cheddar and Monterey Jack blend recommended
- 15 oz canned black beans drained and rinsed
- 1 cup chunky salsa medium heat recommended; use mild for kids
- 1 tablespoon olive oil or cooking spray for coating the Dutch oven bottom
Optional Toppings (add after cooking)
- 1/2 cup sour cream or plain Greek yogurt for a lighter option
- 1 avocado sliced or roughly mashed
- 2 tablespoons pickled jalapeño slices optional, for heat
- 1/4 cup fresh cilantro roughly chopped
- 1 lime cut into wedges for squeezing
- 1/4 cup canned corn drained, optional
Instructions
Prepare the Dutch Oven
- If cooking over a campfire, build a good coal bed and allow it to burn down to steady, medium coals — you want glowing coals, not active flames. If cooking at home, preheat your oven to 375°F.
- Lightly coat the inside bottom and lower sides of a 5-quart Dutch oven with olive oil or cooking spray. This prevents sticking and helps the bottom layer of chips crisp slightly.
Layer the Nachos
- Create your first layer: spread a single even layer of tortilla chips across the bottom of the Dutch oven, overlapping slightly to cover the base completely.
- Scatter roughly one-third of the shredded cheese evenly over the chips, then spoon about one-third of the black beans over the cheese, and drizzle or dollop about one-third of the salsa over the beans.
- Repeat the layering process — chips, cheese, black beans, salsa — for a second layer. Finish with a final top layer of chips, then a generous final layer of shredded cheese on top. (The cheese on top is important — it seals in moisture and creates a beautiful golden crust.)
Cook the Nachos
- Place the lid firmly on the Dutch oven. If cooking over campfire coals, use heat-resistant gloves or a lid lifter to position the Dutch oven over 10–12 coals. Carefully place 8–10 additional coals on top of the lid using long tongs to create top-down heat.
- Cook for 15–20 minutes, rotating the lid a quarter turn every 5 minutes to ensure even heat distribution. Avoid lifting the lid during the first 12 minutes to trap heat and allow the cheese to melt fully.
- If cooking in a home oven, place the Dutch oven (with lid on) in the preheated 375°F oven and bake for 18–20 minutes, or until cheese is fully melted and bubbling.
- After 15–18 minutes, carefully lift the lid to check: the cheese should be fully melted, bubbly, and starting to turn golden at the edges. If the top chips look like they may be browning too fast, tent loosely with foil for the final few minutes.
Serve
- Carefully remove the Dutch oven from the heat and place on a heat-safe surface. Remove the lid away from you to avoid steam burns.
- Add your fresh toppings: dollops of sour cream, slices of avocado, pickled jalapeños, fresh cilantro, and a squeeze of lime. Serve immediately directly from the Dutch oven — set it in the center of the table or picnic blanket and let everyone dig in.
Notes
MEAL PREP TIP: Pre-shred cheese, drain beans, and pre-cook any proteins at home before your camping trip. Store in labeled zip-lock bags in the cooler for effortless campsite assembly.
HEAT CONTROL: Over a campfire, avoid direct open flame — medium coals give the best result. Rotate the lid every 5 minutes for even cooking.
CRISPY CHIPS TIP: Do not add salsa directly onto the top chip layer — keeping the top layer dry allows the chips to stay crispy rather than steaming.
PROTEIN ADD-INS: Add 1 cup of pre-cooked ground beef, shredded rotisserie chicken, or chorizo between layers for a heartier meal.
STORAGE: Best served immediately. Leftovers can be refrigerated in an airtight container for up to 2 days. Reheat on a baking sheet at 375°F for 8–10 minutes to restore crispiness. Do not microwave.
VEGAN OPTION: Substitute dairy cheese with plant-based shredded cheese and skip sour cream or use a dairy-free alternative.
Nutrition
Calories: 420kcalCarbohydrates: 48gProtein: 16gFat: 19gSodium: 720mgFiber: 8gSugar: 4g