

The Southern Dessert That Never Goes Out of Style
There are a handful of recipes that feel less like instructions and more like a memory — and banana pudding is absolutely one of them. For generations across the American South, this humble layered dessert has been the centerpiece of church potlucks, Sunday dinners, summer cookouts, and holiday tables. It doesn’t need a fancy occasion to justify its place on the menu. It just needs a spoon and a crowd of hungry people who are ready to dig in. In our house, banana pudding isn’t just dessert — it’s the dessert everyone asks for by name, every single time.
What makes this version extra special is exactly what makes it timeless: it’s built entirely from pantry staples and ingredients you can grab at any grocery store for just a few dollars. No special equipment, no obscure techniques, no chilling overnight if you don’t want to wait. Whether you’re feeding a crowd of twelve after a big weeknight dinner or prepping something spectacular for a weekend gathering, this recipe delivers big, bold, creamy Southern flavor with minimal effort. That’s the Jango Recipes promise — maximum payoff from everyday ingredients.
We’re talking pillowy layers of rich vanilla pudding, perfectly ripe banana slices, those iconic golden vanilla wafers (which soften into something almost cake-like as they sit), and a cloud of whipped topping that makes every single bite feel indulgent. If you’ve been searching for the banana pudding recipe that your whole family will actually rave about — the one you’ll make again and again — this is it. Let’s get layering.
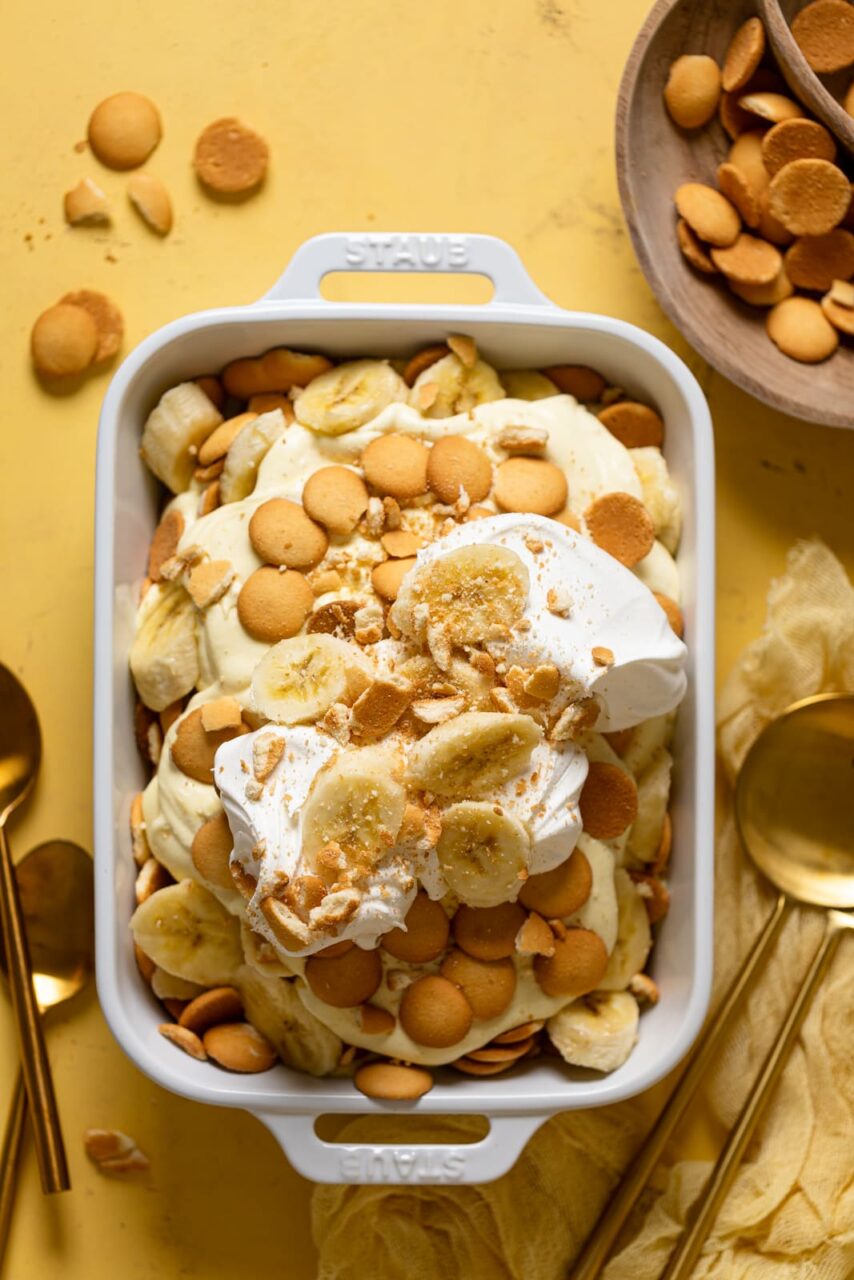
Why You’ll Love This Recipe
- No-bake and no-fuss: This banana pudding comes together without turning on the oven — perfect for hot days when you want a showstopper dessert without the heat.
- Budget-friendly: Every ingredient is affordable and easy to find. You can feed 8–10 people for under $12 total, which makes this a go-to for family gatherings on a budget.
- Make-ahead friendly: This dessert is actually better after sitting in the fridge for a few hours or even overnight, which means you can prep it well in advance and forget about it until dessert time.
- Crowd-pleaser for all ages: Kids love the sweetness and creamy texture. Adults love the nostalgia. It’s one of those rare desserts that genuinely works for everyone at the table.
- Endlessly customizable: Once you have the base down, you can riff on flavors, layers, and presentation to make it your own — we’ll walk you through several fun variations below.
- Pantry staples only: No specialty store runs required. Instant pudding, vanilla wafers, bananas, cream cheese, sweetened condensed milk, and whipped topping — that’s your whole shopping list.
Key Ingredients and Why They Matter
At the heart of this banana pudding is instant vanilla pudding mix, which is the great equalizer in this recipe — it delivers a silky, rich base in minutes without any stovetop cooking. Mixed with cold whole milk, it thickens beautifully and carries that familiar vanilla flavor that makes banana pudding taste exactly the way you remember it. Whole milk makes a noticeable difference over low-fat alternatives, giving the pudding a creamier, more luxurious body that holds up well between the layers.
Next up, cream cheese is the secret weapon that takes this pudding from ordinary to unforgettable. Beaten until smooth and folded into the pudding mixture, it adds a subtle tang and a much thicker, more structured texture — the kind that slices cleanly and doesn’t turn soupy after a few hours. Combined with sweetened condensed milk, you get a depth of sweetness that plain pudding alone just can’t achieve. Think of it as the difference between good and great.
The vanilla wafers are more than a textural contrast — they’re structural heroes. As the dessert chills, these golden cookies absorb moisture from the pudding and transform into something soft, almost sponge-cake-like, while still holding their shape well enough to create distinct, satisfying layers. Using a full box ensures you get generous coverage throughout every tier. And of course, the bananas themselves: choose ones that are ripe but still firm — yellow with just a touch of spotting is the sweet spot. Too green and they’ll be starchy; too ripe and they’ll go mushy and brown quickly.
Finally, whipped topping (or freshly whipped heavy cream if you prefer to go from scratch) crowns the whole thing with an airy, cloud-like finish that balances the richness of the pudding beneath. Fold it gently into the cream cheese mixture to keep things light, and save a good dollop for the top layer. It’s the finishing touch that makes this dessert feel bakery-worthy.
Pro Tips & Variations
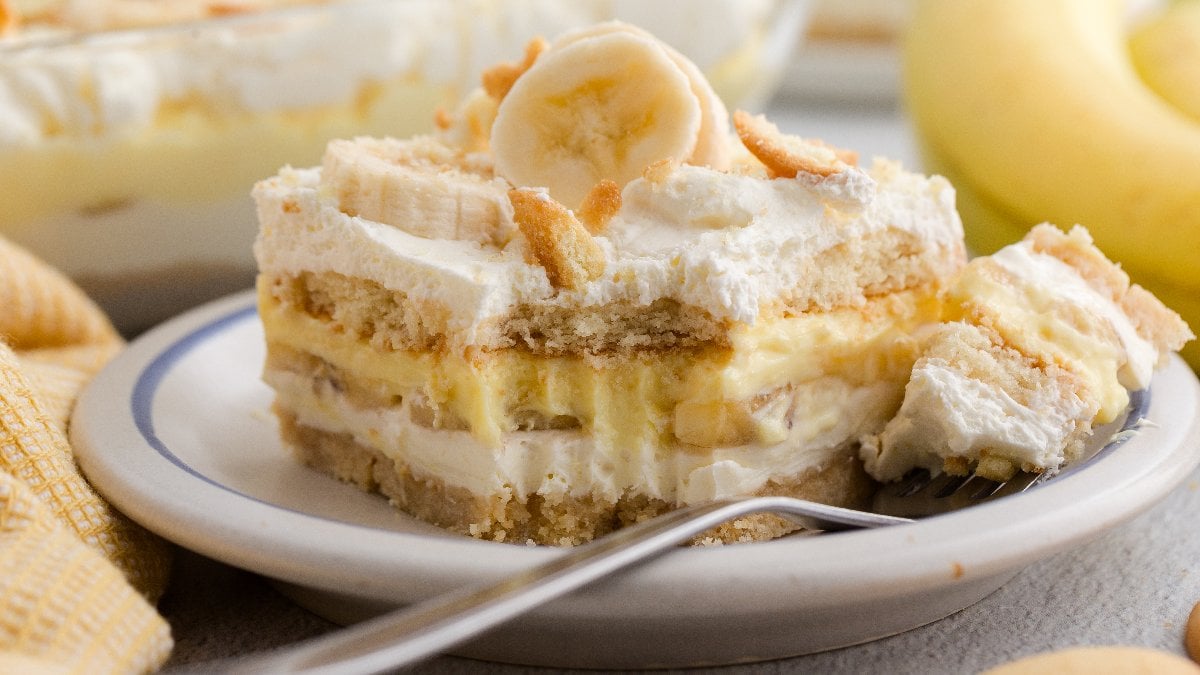
Pro Tips for the Best Banana Pudding
- Let it chill: Two to four hours in the fridge is the minimum, but overnight is truly ideal. The wafers absorb fully and the entire dessert firms up into something spectacular. If you’re making this for a dinner party, prep it the morning before and you’re golden.
- Soften the cream cheese completely: This is non-negotiable. Cold cream cheese will leave lumps in your pudding mixture no matter how hard you beat it. Pull it out of the fridge at least 30–45 minutes before you start, or microwave it in 15-second bursts until it’s completely soft and pliable.
- Layer strategically: Start and end with a wafer layer. The wafers on the bottom act as a base that soaks up the pudding beautifully, and a final wafer crumble on top adds texture and visual appeal.
- Prevent banana browning: Toss your banana slices in a tiny bit of lemon juice (just a teaspoon over the whole batch) before layering. It won’t affect the flavor at all but will keep them looking fresh and golden for days.
- Use a trifle dish for presentation: If you’re serving this at a gathering, a clear glass trifle bowl shows off all those gorgeous layers and is guaranteed to generate compliments before anyone even takes a bite. For everyday family meals, a 9×13 baking dish works perfectly and makes serving easy.
- Pudding consistency tip: When mixing the instant pudding with milk, whisk vigorously for the full two minutes recommended on the box, then let it sit for five minutes before folding in the cream cheese mixture. This ensures it’s fully set and won’t be runny in the layers.
Variations Worth Trying
- Chocolate Banana Pudding: Swap half the vanilla pudding for chocolate pudding and add a layer of chocolate chips between the banana and wafer layers. Absolute game-changer for chocolate lovers.
- Peanut Butter Banana Pudding: Stir 2–3 tablespoons of creamy peanut butter into the pudding mixture before layering. The peanut butter-banana combination is a classic for good reason.
- Nilla Wafer Swap: Try Chessmen butter cookies or graham crackers instead of vanilla wafers for a slightly different texture and flavor profile. The buttery richness of Chessmen cookies in particular is extraordinary.
- Homemade Pudding: If you want to go full from-scratch, Serious Eats has a fantastic from-scratch banana pudding technique that uses a cooked custard base for extra depth — worth the extra time if you’re making this for a special occasion.
- Individual Cups: For easy portion control and kid-friendly serving, layer the pudding into mason jars or clear plastic cups. These travel well for school events, potlucks, and packed lunches (yes, banana pudding for lunch — we stand by it).
- Caramelized Banana Layer: Sauté thick banana slices in a pat of butter and a sprinkle of brown sugar for 2 minutes until golden. Let them cool, then layer them in. The caramelized depth against the cool creamy pudding is absolutely next level.
If you love the idea of easy, no-bake desserts that are big on flavor and low on effort, you’ll definitely want to check out our No Bake Cheesecake — it uses a similar cream cheese base and is another crowd-pleasing fridge-set dessert that practically makes itself. And if you’re building out a full summer dessert spread, our Mixed Berry Popsicles are a fantastic make-ahead treat that the kids will absolutely love alongside a bowl of banana pudding.
Nutritional Highlights
One generous serving of this banana pudding (about one cup) comes in around 380–420 calories, making it a satisfying but not outrageous dessert option when served in reasonable portions. Bananas contribute natural potassium and fiber, which adds a small but genuine nutritional benefit to what is ultimately a comfort food. The cream cheese base provides a modest amount of protein and calcium, and the pudding itself keeps fat moderate compared to traditional baked custard desserts. If you’re looking to lighten things up, you can use reduced-fat cream cheese, sugar-free instant pudding mix, and light whipped topping without dramatically sacrificing texture or flavor — the dessert will still be creamy and delicious, just a bit lower in calories and sugar. For a fun frozen alternative on especially hot days, our Watermelon Sorbet or our Homemade Vanilla Ice Cream pair beautifully alongside a small bowl of banana pudding for a truly indulgent dessert duo. Also, Food Network’s classic banana pudding guide offers some great insight into Southern dessert traditions worth exploring.
Frequently Asked Questions
Can I make banana pudding ahead of time?
Absolutely — and honestly, you should. Banana pudding is one of those rare desserts that improves dramatically with time in the refrigerator. The vanilla wafers need several hours to soften properly and absorb the pudding, which creates those luscious, almost cake-like layers that define a great banana pudding. We recommend making it at least 4 hours before serving, but overnight is truly the sweet spot. If you’re preparing it the night before, just hold off on adding the final whipped topping garnish and crushed wafers until about 30 minutes before serving so the top layer stays fresh and visually appealing. This makes it a perfect dessert for meal prep weekends, holiday prep, or any time you want to get ahead on a dish without day-of stress.
How do I keep the bananas from turning brown?
Banana browning happens because of oxidation — the same reason a cut apple turns brown when exposed to air. The simplest fix is to lightly toss your banana slices in a small amount of fresh lemon juice (about a teaspoon for the whole batch) right before layering them in. The citric acid slows oxidation significantly without imparting any noticeable lemon flavor to the finished pudding. Another strategy is to make sure the banana slices are fully surrounded and sealed by pudding on both sides as you layer — exposure to air is what causes browning, so the pudding itself acts as a protective barrier. Even with both of these steps, banana pudding is best consumed within 2–3 days for optimal appearance and flavor.
How do I store leftover banana pudding?
Store any leftover banana pudding tightly covered with plastic wrap pressed directly onto the surface (to prevent a skin from forming) or in an airtight container in the refrigerator. It will keep well for up to 3 days, though the wafers will continue to soften the longer it sits — which some people actually prefer! We don’t recommend freezing banana pudding, as the texture of the pudding and bananas changes significantly when thawed, becoming watery and grainy. For best results, portion it into individual containers right after making it so family members can grab their own serving without disturbing the whole dish. If you’ve made it in a 9×13 pan, simply cover the pan tightly with aluminum foil and store in the fridge.
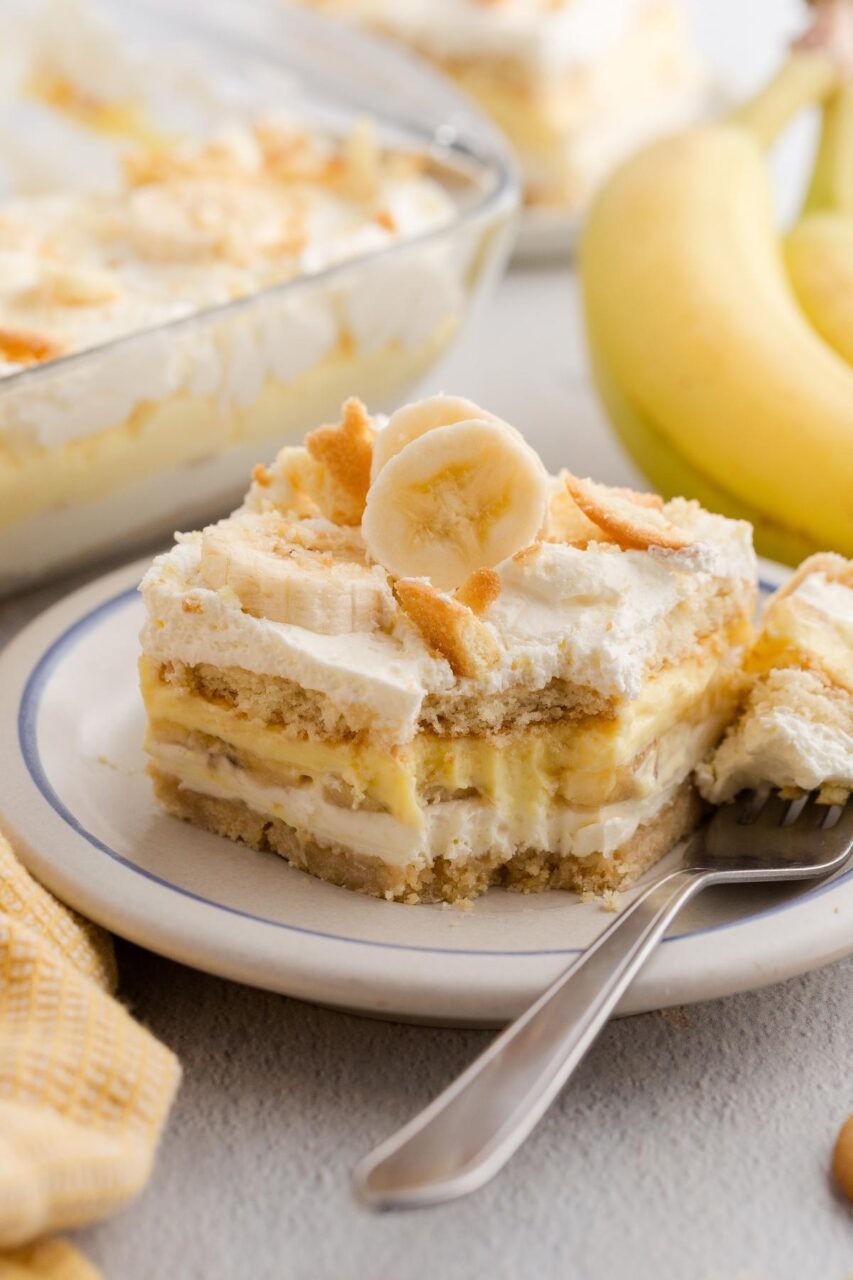
Share the Love — This One’s a Keeper
If there’s one dessert that belongs permanently in your recipe rotation, it’s this banana pudding. It checks every box that matters for practical, everyday cooking: it’s fast, it’s affordable, it feeds a crowd, it can be made ahead, and it tastes like something you’d get at a beloved Southern diner — because it basically is. The kind of recipe that earns a handwritten card in someone’s recipe box and gets passed down because it’s just that good.
Once you make this for your family, you’re going to understand why banana pudding has been a Southern staple for over a century. It’s not complicated, and it doesn’t need to be. Simple ingredients, a little patience while it chills, and you’ve got a dessert that will have everyone scraping the bowl. We’d love to see your layers — share your banana pudding photos on Instagram and tag us, or save this recipe to your Pinterest boards so you always have it handy when the craving hits. And if you’re building out a full menu, pair this dessert with one of our easy weeknight dinners like our Stuffed Bell Peppers for a complete meal that satisfies from start to finish.
Find the complete recipe card below ↓
Banana Pudding
Equipment
- Large mixing bowl
- Hand mixer or stand mixer
- Rubber spatula
- Whisk
- 9x13-inch baking dish or large trifle bowl
- Plastic wrap
Ingredients
Pudding Layer
- 2 boxes instant vanilla pudding mix 3.4 oz each
- 3 cups whole milk cold
- 8 oz cream cheese softened to room temperature
- 14 oz sweetened condensed milk 1 standard can
- 16 oz frozen whipped topping thawed, such as Cool Whip
Layers
- 11 oz vanilla wafers 1 standard box, such as Nilla Wafers
- 5 ripe bananas sliced into ¼-inch rounds, firm-ripe with light spotting
- 1 tsp fresh lemon juice optional, to prevent banana browning
Instructions
Make the Pudding Base
- In a large mixing bowl, whisk the instant vanilla pudding mix with 3 cups of cold whole milk for 2 full minutes. Let it stand for 5 minutes until thickened.
- In a separate large bowl, beat the softened cream cheese with a hand mixer on medium speed until completely smooth and fluffy, about 2 minutes. Scrape down the sides of the bowl.
- Add the sweetened condensed milk to the cream cheese and beat until fully combined and smooth.
- Fold the thickened vanilla pudding into the cream cheese mixture using a rubber spatula until fully incorporated and creamy.
- Gently fold in 2 cups of the whipped topping, reserving the remainder for topping the dessert. Set the pudding mixture aside.
Prepare the Bananas
- Slice all 5 bananas into ¼-inch rounds. If desired, toss gently with 1 teaspoon of fresh lemon juice to prevent browning.
Layer the Banana Pudding
- In a large 9x13-inch dish or a clear trifle bowl, arrange a single layer of vanilla wafers across the bottom, covering as much surface area as possible.
- Spread one-third of the pudding mixture evenly over the wafer layer.
- Arrange a layer of banana slices over the pudding, covering evenly.
- Repeat the layers — wafers, pudding, bananas — two more times, finishing with a final pudding layer on top.
- Spread the reserved whipped topping over the entire top surface in an even, fluffy layer.
- Crush a small handful of vanilla wafers and sprinkle over the whipped topping for garnish. Optionally, arrange whole wafers decoratively around the edges.
Chill and Serve
- Cover the dish tightly with plastic wrap and refrigerate for at least 4 hours, or overnight for best results. The wafers will soften and the layers will firm up beautifully.
- Serve cold, scooped directly from the dish. Enjoy within 3 days.
